ALP Tutorial: Watermarking in Photoshop & Lightroom
Hi everyone! This is part one of two in the Watermarking series. One of the questions that we get asked pretty frequently is how to use your logo as a watermark, or how to place it on images, so we’re going to take you through that process. This post will be about Photoshop and Lightroom, two programs we highly recommend for tech-savvy business owners!
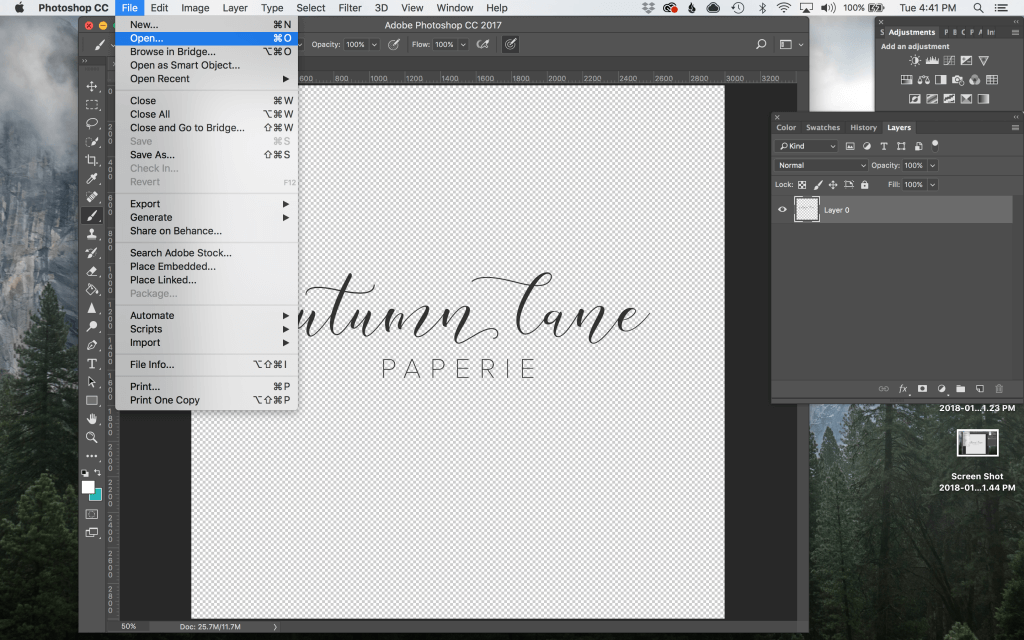
You’ll normally have a variety of files when you have a logo designed with a designer. The PNG is the file type you want for watermarking in Photoshop + Lightroom. Super easy process here — download the file, save it where you want access to it (I always recommend backing up either on an external or an online photo source like Dropbox) and get ready to learn how to watermark your images.
Let’s back up really quick — why are we going to talk about watermarking and what benefits are there to doing so to our products and images?
Why Use a Mark?
I’m glad you asked, or well… I asked myself pretending to be you, that works too right? Good, glad we agree!
So we watermark our images/products to protect our brand. It doesn’t need to be crazy up in your business watermarking — although, sometimes that is valid, as a photographer my watermark is pretty obvious in the galleries to prohibit someone from saving the images via a screencap. But subtle watermarking is like your little own calling card that this product is yours, these images belong to you and hey, look at my cohesive brand that is seen across the board and on my products. So badda-bing, badda-boom that’s an easy way to understand watermarking!
Now… Let’s get back to saving the PNG file! You’ve got it saved off in a location that you’ll remember? Great. Let’s move on.
Photoshop
Open up Photoshop, open up the image you want to watermark. I’m using a pink & gold stock image to also help with variable coloring between light and dark. You’ll also need to go ahead and open up your logo. So you’ll have two files open, your image and your logo — just like below!

So this is where things get fun and easy, simple and clean.
You’ll go ahead and select the marquee tool (it’s that lovely little dotted square to the left second one down) head over to your logo and pull the marquee tool around to make sure you get the entire logo in the dancing ants. Clearly, fancy technical terms are in abundance when I’m at the keyboard! 😉 Now, copy it! CTRL or COMMAND C will do it for ya!

Once you’ve copied the logo you’ll head over to your image, clickity-click on that bad boy.
This part is easy, just hit CTRL/COMMAND V. You’ll also find it under edit on the top menu, we’re basically using a shortcut for paste. Your logo will pop up onto your image.

As a side note, here’s a handy link for all shortcuts in Photoshop. Keyboard shortcuts make the world go ’round.

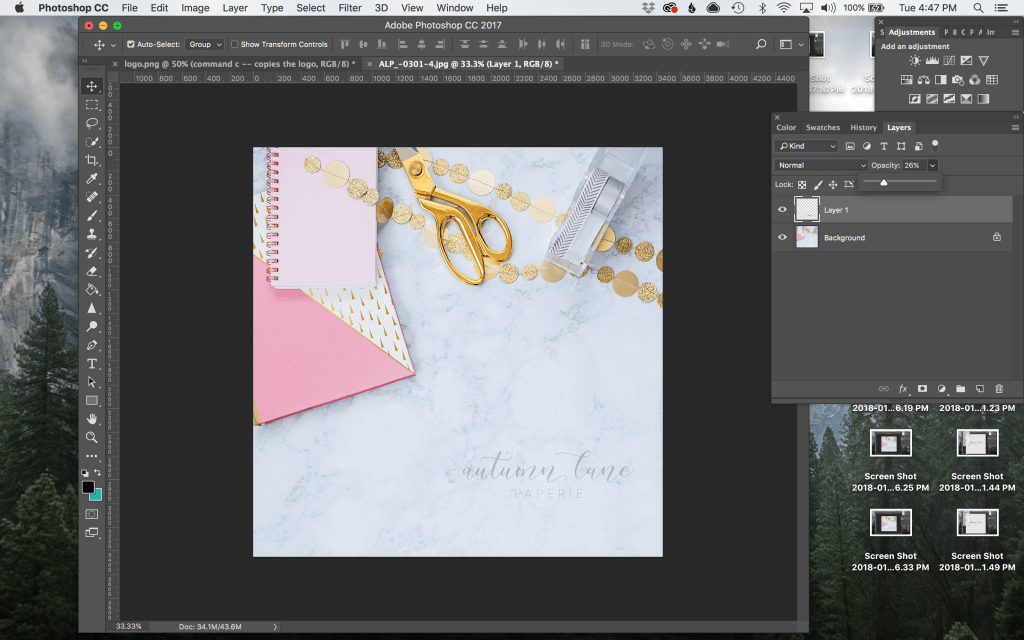
CTRL/COMMAND T (under edit, Free Transform is what we’re looking to do, Command T is the shortcut) will create a box around your logo, and this’ll be how you resize to what you’re looking for on your image. You could leave it big and fancy like above (great for social media or default images) or you can hold down shift (this will lock the dimensions), click a corner, and drag to resize to what you’re looking for to protect your images.
Right above LAYER 1 (your logo) you can see the opacity of your image, move that slider around until you reach a level of satisfaction on the visibility of your watermark. I tend to keep my watermark on the less visible side. I find that 25% is a good “Hey this is my logo but also look at my beautiful work!” percentage.
Then go ahead and use the move tool (“v” on your keyboard) and you can place the watermark where you want it!
Also, if you want another way that isn’t just pulling down the opacity, you can do that with the window next to the opacity, I tend to preference overlay which kind of fluctuates the opacity of the logo depending where it’s sitting. I moved the logo onto the notebook to show you the opacity on a darker color to show how you can still see the logo, it’s subtle but visual.

Viola! You now know how to watermark using Photoshop.
Lightroom
Now let’s give everyone a demonstration on watermarking with Lightroom, another great Adobe program that has a nice user-friendly way to do this.
With Photoshop you have a lot more control on where the logo goes, with Lightroom you will have the ability to quickly add your logo to several images.
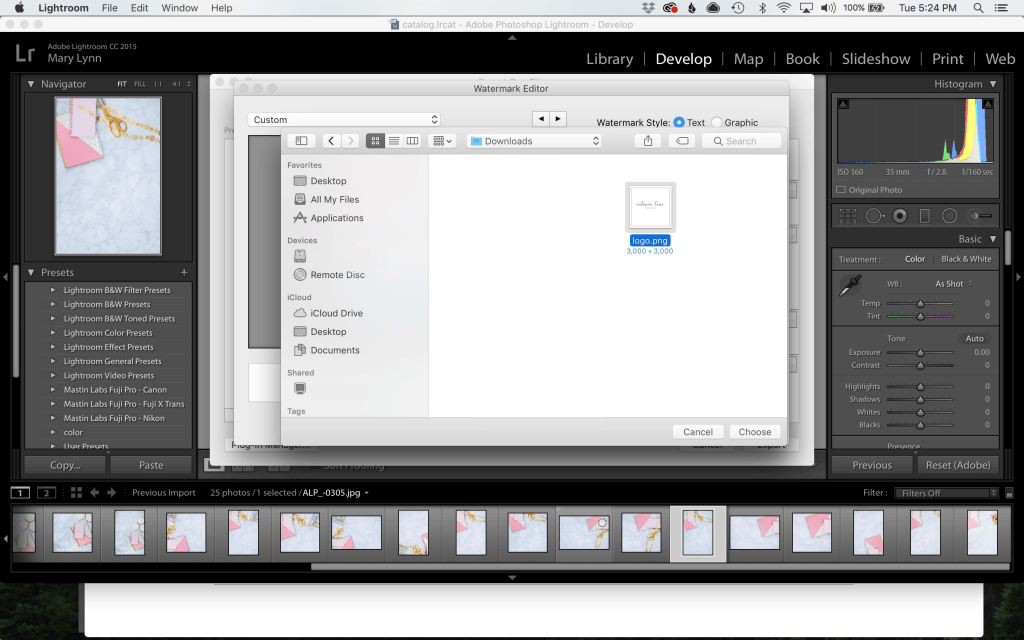
Alright, so let’s start by saving the logo and opening up Lightroom. You’ll load your logo here. I’m going to go ahead and make an assumption of basic Lightroom knowledge on importing your image/products. This might be edited and updated at some point to walk through using Lightroom. Until then, basic knowledge is required of Lightroom!
Let’s talk a bit about the benefits of using Lightroom for watermarking.
It’s quick, you set it up once and boom, it’ll be applicable to sets of images at a time. It’ll be seamless and the same on every image set you export. It’s a time-saver. Photoshop gives you a lot of control on size/where the watermark goes, but Lightroom gives you the freedom of time but you relinquish some control on where the logo goes (it’s not like it decides for you, however we’ll get to that in the photos and what that means).
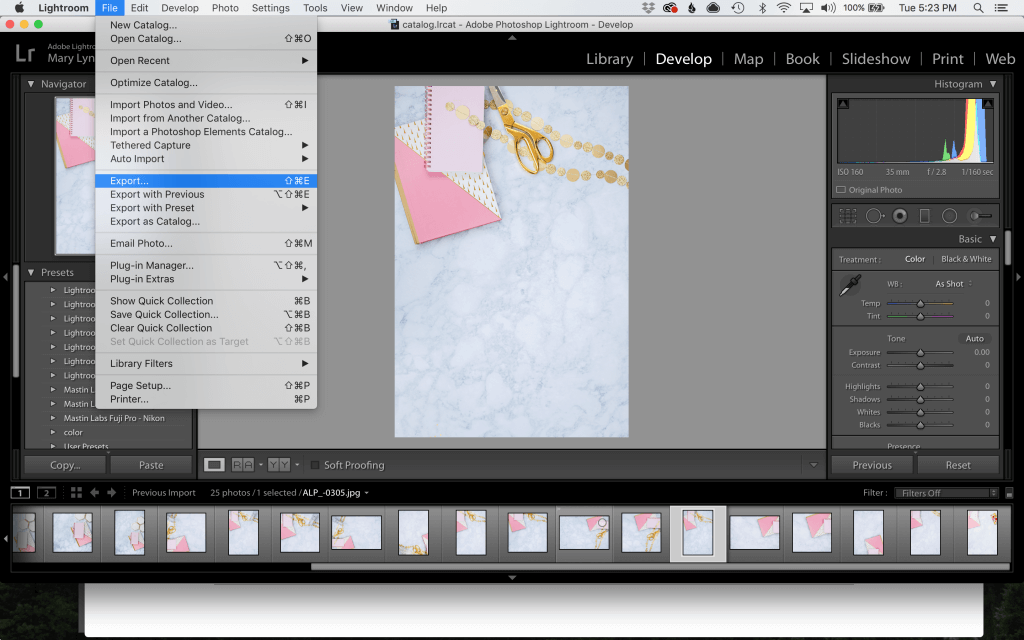
Alright, so you’re going to select the images you want to watermark/export for use. For the purpose of this tutorial, I’ve selected one. Makes it a bit simpler! Alrighty, head over to FILE — you could shortcut (CTRL/COMMAND + SHIFT + E).

We’re going to do a bit more assuming that you’ve exported files from Lightroom before, so all your settings are set the way you’ve got them and they’re being saved to a folder of your choice, so you’ll scroll down until you reach watermarking! This is where we’re going to mess with settings.
Go ahead and click on edit watermarks…
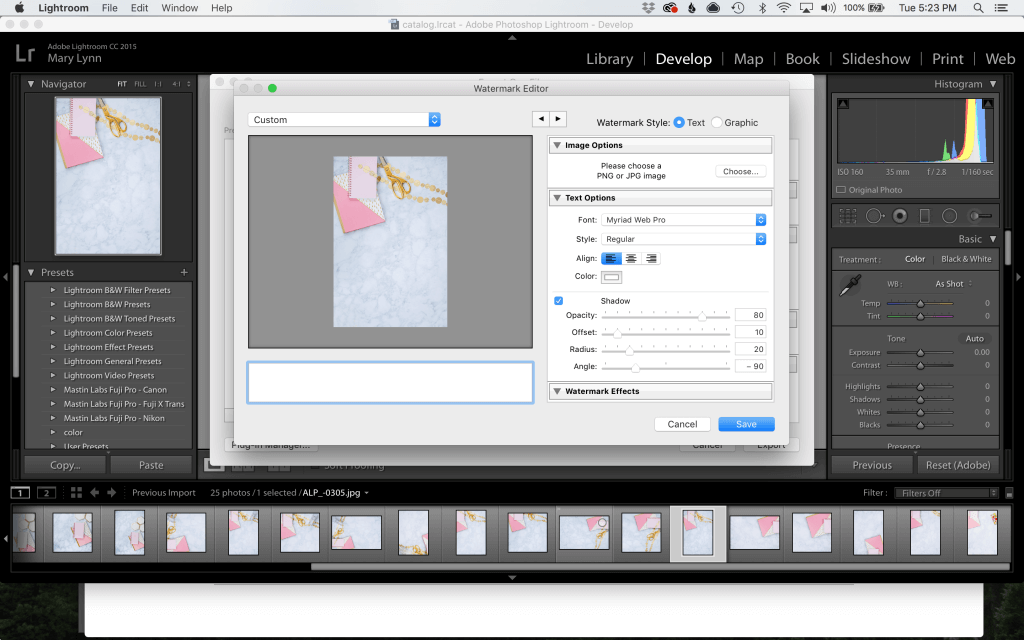
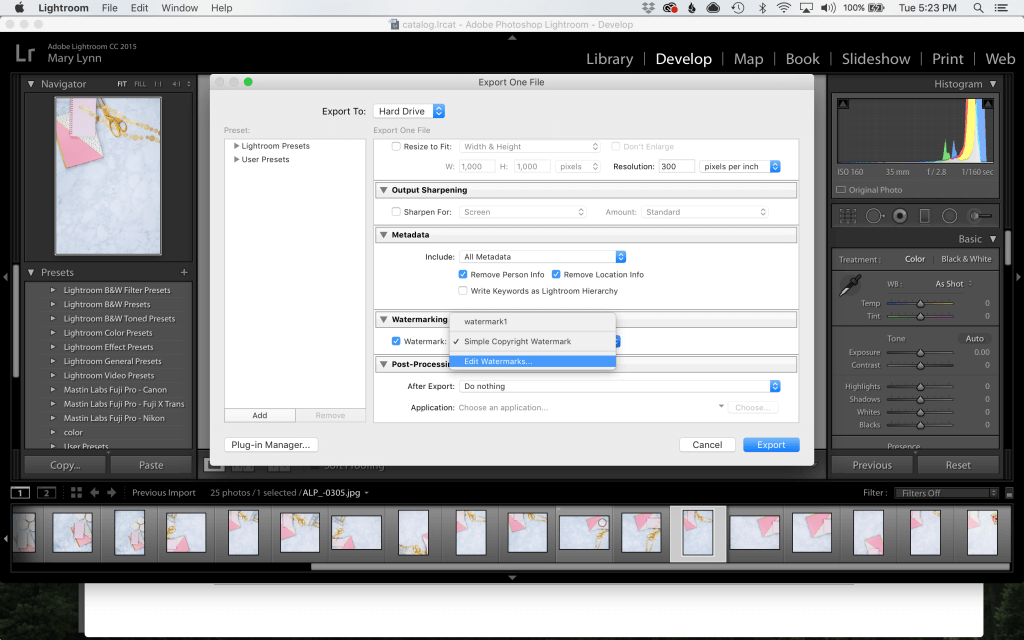
You should see one of the files selected and the above window. Now, you could easily just add some text to your images as your watermark, but that wouldn’t really be cohesive and seamless with your brand/logo. So we’re going to do Image Options and upload our logo instead of using text!
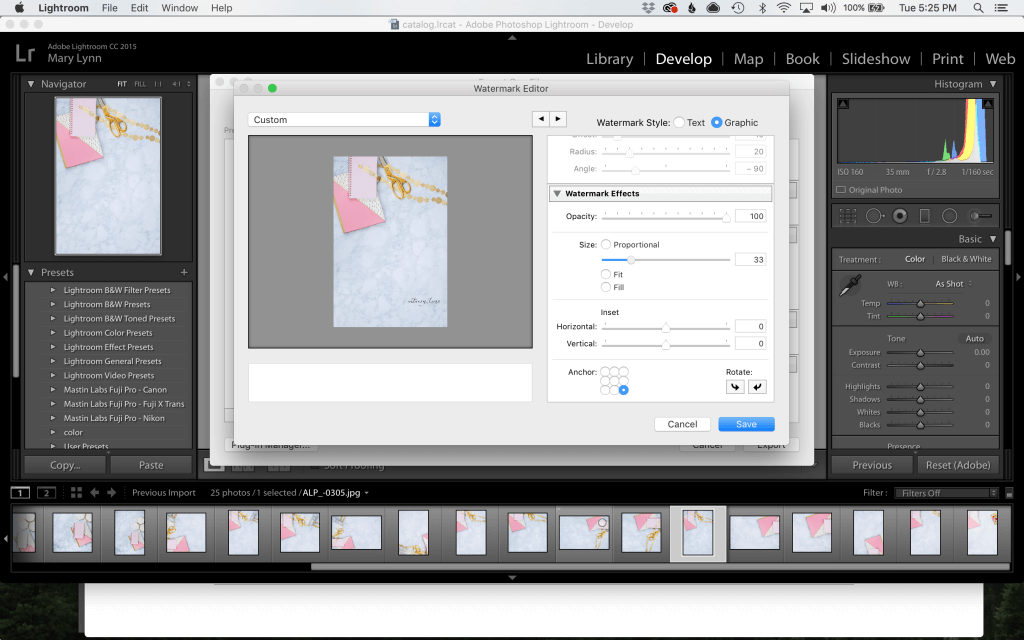
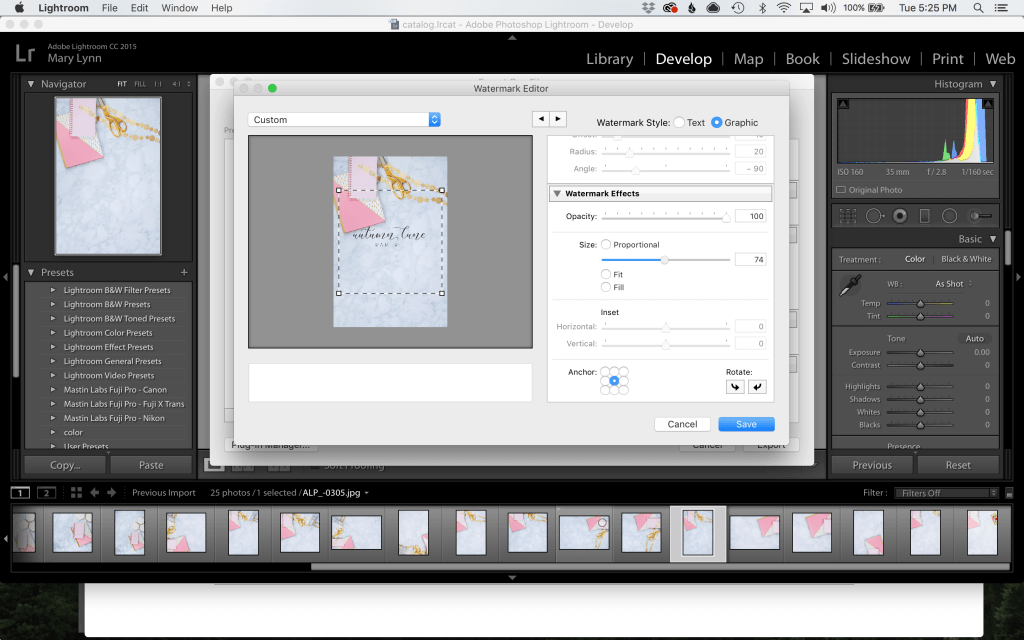
Oh look, there we are! Now scroll down to Watermark Effects.
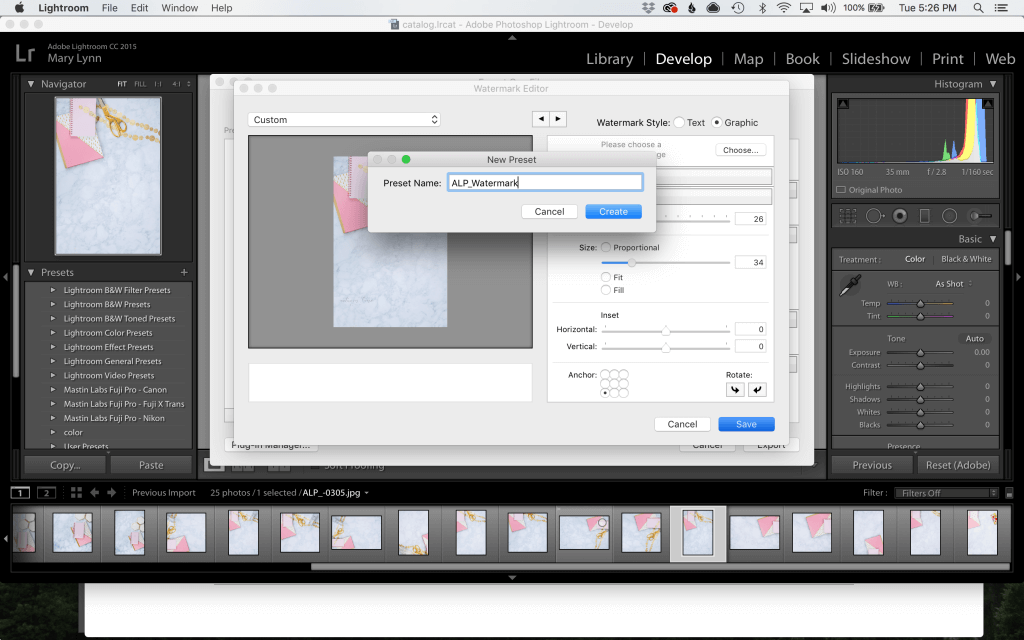
You can mess around in here for the opacity, size and where it’ll be at. So go ahead and anchor it to a corner, center, top, whatever suits your fancy and your needs. Keep in mind, when exporting sets where your logo will be at and how it will be visible (opacity, size, etc) will be important to the set of images you’re exporting with the watermark. You can use horizontal and vertical above anchor to slight adjust where exactly the image is anchor to. After that, click SAVE and give your logo a name (ALP_watermark — you can make a few different logos, white/black/blue and in different areas so that you can choose which works best for the set of images you’re using, this is all entirely preference at this point and time consuming up front but a game changer for productivity later on).
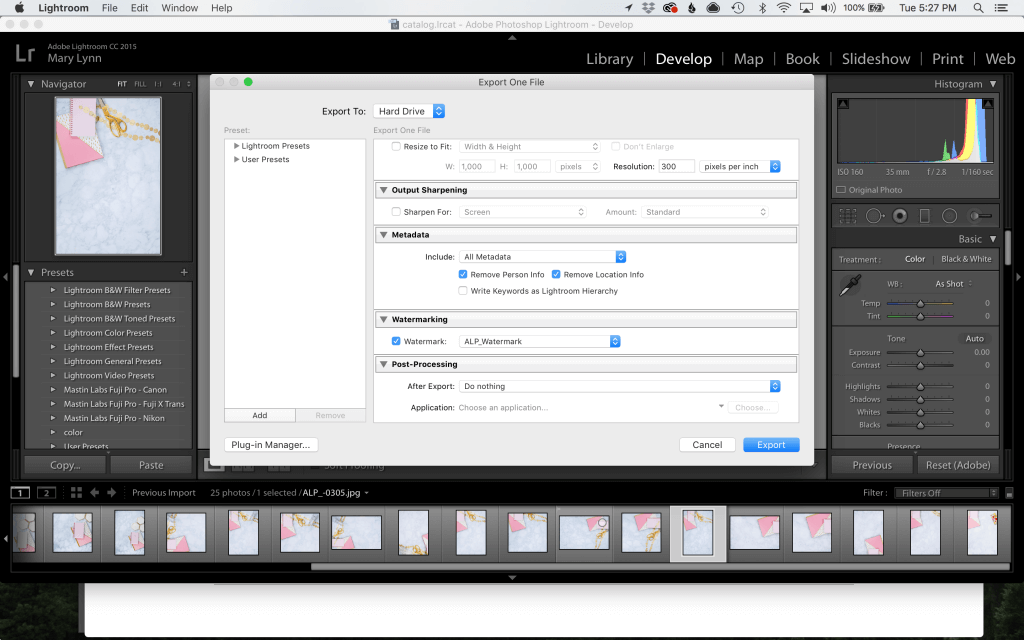

You’re done! Throw some confetti around hit ‘Export’ and go to your folder to check out the groovy logo on your set of images. You are now proficient in watermarking in Photoshop AND Lightroom!! Throwing out a virtual high five for hanging in there and learning some new skills!
2 thoughts on “ALP Tutorial: Watermarking in Photoshop & Lightroom”
Awesome! Thank you, Mary! I’ll be sending clients here to save time for them and me too!
Barb
It’s all about making it easier for folks!